Everything you need to know about photography’s ISO, aperture and shutter speed
 Posted On
If you’ve delved a bit into photography basics, you’ve probably heard that exposure can make or break your outcome. Have you ever taken a photo and thought, “Well, this could have gone better?” You probably had bad lighting! But lighting can be fixed. Well, at least exposure can.
Yes, exposure, which determines whether your photograph will be on the darker or the lighter side, can really impact the quality of your photos. That’s precisely why every photography tutorial includes plenty of information about it.
Now, if you’re a complete novice, you might think that exposure is this huge thing that you have to work years to figure out. And, it is. However, it doesn’t mean you can’t work on it now.
In reality, there are only three settings on your camera that you need to figure out to master exposure — ISO, shutter speed, and aperture. Of course, mastering them will still take some time. Still, checking out an aperture, ISO, and shutter speed tutorial such as this one is an excellent way to start.
Analyzing Aperture
The three settings we mentioned are also known as “the exposure triangle.” Together, these three settings determine how light (or perhaps dark) your photo will be. But how?
Aperture affects the depth of field and is a crucial part of exposure. Why? Because it physically affects the amount of light that is allowed into the camera body. Do you know those small blades on the lens that you see open and close when you take a photo? That’s aperture!
The blades form an octagonal shape, and you can widen or close them, depending on how much light you want to let into the camera. And, because aperture also affects the depth of field, by using it, you can control which portion of the photograph you want to be in focus (or sharp).
Aperture and depth of field are inversely proportional. The bigger the aperture, the smaller the depth of field (and vice versa).
Aperture is expressed in “F” numbers. If your photo is too bright (for example, taken at F3.5), then, in order to take a darker photo, you need a smaller aperture (F5.6, for example).
But what happens with the depth of field? Well, if you want to take a photo of a landscape, you want the entire area to be in focus, right? To do that, you need to select a small aperture size.
Therefore, you’d pick one of the higher F numbers. Alternatively, if you’re looking to take a portrait where the person is in focus while the rest of the field isn’t, you’ll opt for a wider aperture. That means that you’ll pick smaller F numbers on your camera settings.
Learning About ISO
Unlike aperture, ISO controls the exposure via the software inside your camera. So, you can’t physically see it.
In simple terms, ISO is a part of the software that determines how light-sensitive the camera is. This setting offers you a chance to brighten your photos when you can’t use aperture or shutter speed.
But how? Well, if you opt for a higher ISO number, it means that the camera will be more sensitive to light. In other words, you won’t need as much light to make the image as bright as you want.
ISo is actually the first part of the exposure triangle that you’ll sort out before taking a photo. ISO ranges from 100 to 3200, and the brighter the setting you’re trying to photograph, the lower the ISO number you’ll want to pick.
But, if you’re shooting at night or when the lighting isn’t really all that great, you’ll want to opt for a higher number. It will increase the camera sensor’s light sensitivity and allow you to capture the thing you’re shooting even if there’s not enough light.
Understanding Shutter Speed
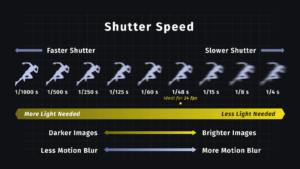
While aperture determines how much light will hit the camera, shutter speed determines how long the light will hit the camera. It’s actually what people mean when they say “exposure time.”
Inside of your camera, there’s a little curtain that falls down and comes back up when you take a photo. Now, how fast it does that depends on the number you picked when you were in the “shutter speed” settings.
That curtain is actually called the shutter. So, shutter speed is the speed that reflects how fast that little curtain falls down.
The faster the shutter speed, the more likely it is you’ll be able to catch objects in motion. So, if you’re taking a picture of a person waving, and you opt for a fast shutter speed, their hand will be in focus. If you opt for a slower shutter speed, you’ll have a blurry hand on your photo. It’s simple as that.
However, if you’re shooting at night in low-light conditions, you’ll want to use low shutter speed. They allow more light into the camera and are better for such situations.
How Professional Photographers Use These Three
The exposure triangle controls the light. Aperture and shutter speed control how much light makes it into the camera sensor, while ISO controls how sensitive the camera sensor is. If you know the relationship between the three, you can take better pictures, no matter the setting and circumstances.
Here are the basics that you need to know — if you adjust one of the settings, you need to change one or both of the other ones in the opposite direction. For example, let’s say that you decided to lower your aperture and let in less light into your camera and focus on the big picture (literally). Then, you’ll need to either adjust your shutter speed in the opposite direction or both your shutter speed and ISO.
The key is to maintain a balance. If your aperture is two stops lower than it was, then your shutter speed needs to be two stops faster. Alternatively, you can adjust your shutter speed by one stop and your ISO by one stop to maintain the balance.
Additional Tips for You to Practice
Now, all of this seems simple, right? But how do you use it in real life? How can you apply the knowledge about the exposure triangle to make your pictures stand out?
One of the things you could do is experiment. For example, try taking pictures of something in motion and experiment with all settings.
If you want to take a motion blur photo, the key is adjusting the shutter speed. Adjust the shutter speed to the highest setting. Of course, make sure you adjust the other two, so they align.
If you want a freeze motion photo (like catching droplets in the air), you’ll need to increase your shutter speed.
Overall, many cameras will make the adjustments for you. However, the best thing you can do is opt to shoot in manual mode. That’s the best way to ensure you understand the relationship between all three settings. Finally, remember to have fun! Photography is a beautiful art form and, before you know it, you’ll figure out how to take amazing pictures with perfect exposure!